SSL Certificates Installation Instruction - Tomcat \ J2EE Application Server
1. Save the certificate file
You will receive a email that contain a zip file after your SSL certificate is issued, the zip file have 3 files: one is like UTN*.crt, this is the root CA, no any use, second is like WoSign*.crt, this is the intermediate root, please rename it to wosign.txt, the third file is your SSL certificate like www.mydomain.com.crt, rename is as certificate.txt.
2. Import the certificate
Use the keytool command to import the root certificates as follows:
keytool -import -trustcacerts -alias root -file utn.txt -keystore [keystore_name]
Use the same process for the WoSign certificate using the keytool command:
keytool -import -trustcacerts -alias INTER -file wosign.txt -keystore [keystore_name]
Use the same process for the site certificate using the keytool command, if you are using an alias then please include the alias command in the string:
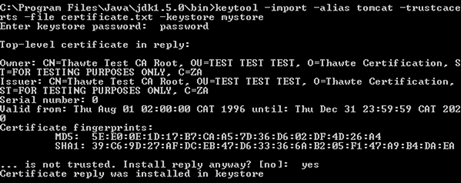
keytool -import -trustcacerts -alias [keyEntry_name] -file certificate.txt -keystore [keystore_name]
In the example in this screenshot we are using a Test Certificate.
Note: If you did not specify a keystore name when the keystore was originally generated please omit the -keystore parameter from the command)
When you execute this command you will be prompted for the keystore password, please specify the password you set when you generated the keystore.
When importing the certificate into your keystore use the same alias as the private key the certificate request (CSR) was created from (this will be the keyEntry listed in your keystore) and use the '-trustcacerts' parameter in your keytool -import command. If you do not specify the alias of the keyEntry your certificate will not be tied to the private key and you will not be able to use the certificate properly.
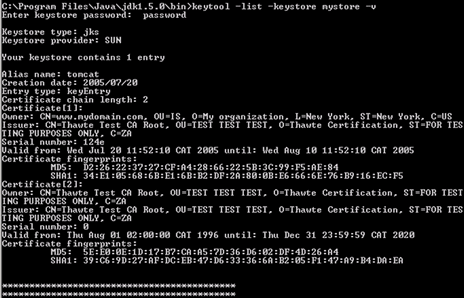
If you are unsure of the alias for the KeyEntry please use the following command to check the output from the keystore in order to verify the keyEntry name (alias):
keytool –list -keystore [keystore_name] -v
以下图例的别名为:tomcat。In the example in this screenshot the alias is “tomcat”.
3. Edit the Tomcat configuration file (server.xml)
Tomcat keeps its configuration information in a server.xml file, make sure Tomcat is reading the correct keystore file and keystore password and that port 8443 is enabled for secure connections.
(a) Please open up the server.xml config file using a text editor (JAKARTA_HOME/conf/server.xml)
(b) Please search for the secure element in your config file, by default it should look something like this:

(c) Please make sure the ‘keystoreFile' directive is referencing the correct keystore and the 'KeystorePass' directive is referencing the correct keystore password.
(d) Please save the changes and stop and start Tomcat.
4. Setup the serverMake sure you assign port 8443 and a unique ip address to the virtual host.Note: If the server is behind a firewall please make sure port 8443 has been enabled on the firewall.
Test your certificate by using a browser to connect to your server. Use the https protocol directive (e.g. https://your server/) to indicate you wish to use secure HTTP. The padlock icon on your browser will be displayed in the locked position if your certificates are installed correctly and the server is properly configured for SSL.